Category: Blog Posts

Artists and Health Issues Part 2

I got some great feedback from folks on the last post concerning artists and health issues and thought I’d share some of the tips with everyone. I also forgot to mention a few other tactics that I’ll go ahead and share here:

 
Get a proper desk! –  I didn’t mention that half of what caused my neck and shoulder issues was working on a computer desk that was about 5 inches too low for me for a matter of years.   It was never meant as a computer desk and, as such, I was always hunching further over it in order to type.  My monitors were not eye level either, even though I had them propped up on books. Monitors should always be eye level or just below eye level so you are not looking down and constantly stressing your neck.  I’ve since gotten another desk, but damage had already been done.
 
As for art desks, try to get one that you can slant and adjust the height, which also helps you from hunching and looking downwards all the time.  Another tip if you have a desk you can’t adjust is to get a tabletop easel to stand your artwork on so it will be eye level, or at least not laying flat on your desk so you have to hunch and look down all the time.
 
Get a proper chair!  – Kind of goes with get a good desk!  A crappy chair at the art or computer desk can do just as much damage to your posture as sitting like a gargoyle can.  High stools are great if you like to paint on an easel and want to sit down instead of stand up.  Your back should be straight while your elbows at a 90 degree angle to your keyboard.  Personally, I am investing in one of these kneeling chairs for when I work at the computer because it looks so comfy and encourages you to sit up straight to maintain proper balance.  Best of all, it seems you can get them for fairly cheap!  There are all sorts of fancy chairs that adjust to the human form, but they’re almost all too expensive for my shoestring budget.
 
Go swimmin’! –  This was great advice from a commentor who is also a physician.  Swimming is low impact so there’s less chance of pulling a muscle or hurting your joints doing some crazy exercise you’re unfamiliar with. You don’t need to be doing olympic laps either, you can even have a flotation device, it doesn’t matter, you just need to move.  Plus, it’s fun!  I love to swim so I was glad to hear this advice.  I do so miss underwater tea parties from when I was little.  Time to bring them back!
 

Snack healthy – I forgot to mention this in the last entry, but some of my low energy came from just grabbing whatever was around when I felt like nibbling.  I’ve since replaced potato chips and chocolate with bananas and Greek yogurt. Both are extremely healthy for you, bananas providing tons of potassium and other vitamins and energy, while Greek yogurt has probiotic properties, the protein also filling you up longer than other snacks. Getting a Body Contouring Scottsdale is probably one of the healthiest things I ever did for my body too.

Nuts (like almonds and cashews) are also good to munch on and tide you over till the next meal time. I’m always snacking on these throughout the day to keep my energy levels up and it’s worked wonders for me. A girlfriend of mine once told me eating healthy is especially important for women’s health, im talking yeast, and when spends all day sitting, well, need I go on? There’s still the occasional chocolate, for what artist in her right mind would give chocolate up completely??  Plus, dark chocolate has antioxidants so I can make exceptions for it.

 
As for my own health status?  It’s the last week of physical therapy for me and I’m doing great!  I’ll have to keep up the exercises for my shoulders, neck, and back even after our last session this week, but that’s going to be good for me in the long run.  I have been using a lot of resistance bands for training and they provide simple low impact exercises I can do from the comfort of my own home.  Some of the stretches seem almost too simple, but the soreness is surprising!
 
I feel less like I’m going to end up like the humans did in Wall-E (ie. boneless blobs without social lives) since I started the physical therapy and started working from the studio as well.  I am doing great and I thank all of you for your well wishes and support!
 
Now, go forth and create! (And remember to take breaks!)

My Studio Photo Tour

Last post I mentioned the fact that I was able to fanagle a studio spot in a small gallery in town where my mother and I are sharing a little work space (about 10’x10′ all in all).  At $200 a month ($100 a piece), it’s a pretty sweet deal!  I’ve spent all of this past week prepping it for display and the ensuing flood of art junk that will finally make it habitable for an artist.

Without further ado, I present to you a photo tour!

Oh what’s that nook shining in the dark?
Come closer, my pretties!  The shinies await!
Still filling out the walls. A banner will probably go there in the top-middle.
To the left, we have my mom’s corner of the gallery where she makes shinies for
the magpies in all of us! She has an Etsy shop called Lee’s Curio if you want to see more.

Inside of the door. An artistic shot of the print rack.

These look familiar to anybody? They were the ‘bottled dream’ jars from
my senior show at West Georgia! So far, I’ve gotten more questions
about what the jars mean than the artwork, itself.
Curiosity is funny that way.

Close up of my leather crafts! I have them stacked on top of clear
collectible cases that were meant to hold dolls that I found on clearance.
They’re perfect for stacking for translucent tiered displays.

A close up of the print bins. Got the 3 bins on the left from Walmart in
the plastic bin aisle.  They’re sold as ‘shoe bins’.
The card bins on the right were from Michaels.  Clearance specials FTW!
To the right we have my little work space. That glowing immaculate spot on the counter is
where I’ll soon be painting! I expect that counter won’t be so clean in the near future. You can tell
I’ve barely had a chance to work in here because it’s so clean and bare of art supplies.

The pictures on the wall are temporary placeholders till I can get some works in progress going.
Check out how awesome the print of Persephone came out!
Kudos to Photos2canvas2u for their awesome canvas print rates!

That’s all for now!  Expect a video tour in the near future as well.
I suspect I’ll have a follow-up photo tour once the studio has been nice and dirtied up with work!
I can’t wait to get started. Bua ha ha!  What is your studio like? Feel free to share in comments!

Artists and Health Issues

There has been a disturbing pattern emerging the longer I work a creative job, one I’m especially beginning to appreciate now that I’m in my second week of physical therapy for ‘repetitive shoulder stress’ and an ‘unstable shoulder joint’.  This occurrence after a year of ignoring shoulder aches and soreness was quite the wake up call for me.  The ability to use my arm is my livelihood and being incapacitated in any major fashion could be disastrous!  Luckily, my issue is only a moderate one which physical therapy is helping, but there is a bigger picture at work here.

Thinking back on things, I have gained about 15 pounds since I started working long hours at the computer and art desk.  I’ve had stretches of mental and physical fatigue caused by overworking, tight deadlines, and just being downright lonely.  Sometimes I’m so passionate and excited about my job, I just keep working and working without taking any breaks. Other times, I just can’t get motivated. There is no inspiration, and worse, I start to lose hope that this job is not worth the mental and physical pain it causes me.

I can’t help but feel much of the downturn in my overall health has come from a decrease in physical activity and social interaction.  I feel loads better this year now that I have made a concerted effort to change a few bad habits.  These are some of the things I’ve done that have helped to improve my health lately:

– Taking regular breaks. It’s so incredibly easy to just keep working and working in a job that you are so passionate about!  I learned the hard way if you don’t get up at least once an hour from the computer or art desk, you’re really doing damage to your neck, back, and shoulders.  Nowadays, I have to get up or damage my joint more.  I take a moment each hour to go and talk to whoever might be home, take a small walk around the yard, or to do a few Yoga stretches.  I find the Tree the Warrior, and the Cobra poses to be particularly helpful for my sore back and neck pains (and are pretty easy to do).

– Taking regular walks.  I don’t have a lot of time to run to the gym, so mainly I just take 30 minutes out of the morning and evening to go on walks.  There’s a gorgeous country road right near our house which I can walk on for this amount of time and never hit the end.  A plus side is the healthy population of hawks, squirrels, blue birds, owls, and wildlife that dart around me while I walk. It’s soothing for me to get away from the technology and meditate while I walk to the sound of nature.

– Visiting a gallery and being social.  Internet friends keep me sane, but getting out of the house once a week to visit the local gallery helps me to meet other real living, breathing people who I can talk to, who are generally just as interested in art as I am.  After long hours working alone, it sometimes feels like my life is passing me by while I’m toiling away trying to make a living at an unappreciated, underpaid job.  A coating of stoic disapproval starts to settle on me and I have to shake it off by getting OUT, or risk getting really demotivated for my work.  I’ve started attending local art organization meetings recently as well, which has been great for meeting other artists trying to make a business out of their artistic identity (we are not alone in our insanity!).

It’s also been nice gathering a group of friends on Skype once a month for a ‘drink and draw’ event.  There’s just something nice about being able to listen to people I don’t see often and draw random stuff.  Using Skype also leaves your hands free so you can talk instead of type to chat!  Great for actually getting art done at the same time.  This has been especially nice when I can’t afford to go to the local drink and draw because it takes gas and parking fees and, you know, finding a way to drive back later once I’ve sobered up.  Drinking in the comfort of one’s own home is (theoretically) safer.

– Working in a studio vs. working at home. Today was the first day of working at a small rental studio instead of at our house and I can already feel the productivity juices flowing! (Pics and video to come soon!)  The space is a modest $200 a month ($100 since I’m sharing with my mom).  Being there instead of at home has allowed me to focus solely on creative thought and the projects I have to work on, whereas at home, I am always compelled to clean the house (considering my workspace is my bedroom and office AND studio, it’s very easy to fall into chaos).  I also get distracted by what other family members are doing, or am around negative influences that don’t provide the encouraging and positive attitude I need to maintain my level of productivity.

Another perk of the studio is that I can talk to the other artists there and not feel like a hermit.  I can also talk to any customers that wander in and peddle my wares directly, which helps to put a face on my work, and theoretically encourages them to buy.  I plan to add classes at the gallery to my repertoire of skills and activities as well, which will give me valuable practice at conveying ideas to others.

So I hope that this has been helpful to anyone who might be reading this and has found that the work-at-home freelancing artist is not near as glamorous as you expected it to be.  Good luck to you, and remember to take regular breaks!  I wonder what kind of health issues related to your creative work you all have dealt with and how you have dealt with them?  Please share in comments!

My Anatomy Improvement Wishlist

In an effort to improve problem areas of anatomy, I present to you My Anatomy Improvement Wishlist, or exercises I intend to do involving the following:

  • Hands – I still have problems with fingers at foreshortened angles and the joint of the thumb to hand/wrist.
  • Feet – Less troublesome than hands, but still alien to me in their funkiness.
  • Faces – Specifically various facial expressions and different facial types.  To help me draw people who look diverse instead of like myself. Also concentrating on the planes of the face for better understanding of how varying light defines facial features.
  • Arms – Mostly the construction of the bicep/tricep area. The way these muscles interact baffles me.
  • Man crotches – Don’t laugh!  The way pants and clothing drape over this…complex…area of anatomy always looks too tight or just plain flat and weird the way I draw it currently.
  • Man Waists – To help battle my bad habit of drawing men with feminine waists.

How will I fight these difficult areas of anatomy?  With practice…and chocolate (and coffee)!  I’d like to do the 100 drawings of each exercise and will probably shift my studies of life drawing towards planar breakdowns and contour exercises instead of the usual gesture and shaded drawings I’ve been doing with the Pixelovely tool.  They say you have to draw something, 10,000 times to know it completely by memory. I think I’ll just try 100, for starters.

Once this month is up, I’ll probably dump the best picks from my studies here for you all to see.  In the meanwhile, what areas of anatomy do you all have problems with?  How do you plan on combating your problem anatomy areas?

Stay creative!

Gaps of Knowledge

It’s been nothing but work-work-work for me these days while I focus on getting my Etsy shop set up as my main outlet. I seem to have taken an unannounced hiatus from conventions this year, with book signings, Faerie Escape, and DragonCon being the only things on the schedule thus far. It’s been a much needed step back to figure out where I want to go, how I want to survive in the meantime, and what exactly I need to learn to make myself more viable in my chosen field. While I’m pretty confident in my traditional media, I feel like I still have so much to learn as far as digital rendering goes.

Slowly but surely, I’m completing new digital pieces and learning so much with each one, but still there is always more to learn when it comes to using such expansive programs as Photoshop, Painter, and Illustrator (haven’t touched the last one much, but I feel I should at least know the basics of it for my own good and to make my list of skills that much more appealing). I’m hoping at some point in the future I can take some of the courses at the Computer Graphics Master Academy, but that will have to wait till I have the extra funds. Wow, what a class list, though! I could just spend half my life in there learning it all.

So here’s me, feeling daunted by all the skills I need to brush up on (figure drawing, digital coloring, conceptualizing, lighting, etc. etc. etc.) and it begs the question do artists and creative professionals in general ever stop learning? I suppose that’s what makes our field so interesting (and challenging) to be in. 

For now, I am simply self-teaching and gradually clawing through the reading list of study sources I compiled earlier and a host of The Art Department videos I caught on sale. So much to learn, so little time! Baby steps, Angela, baby steps. Hoping all this knowledge sticks at some point or another. Just have to keep up the repetition till it does!

Till then, I’m afraid I don’t have much interesting to post or share here while I’m in Learning Mode, beyond some studies.  You all like studies, yes?  Prepare for the LEARNING!

Critique Corner – Persephone by Maria

For today’s Critique Corner, we have an image by Maria Arnt.  Check out some of Maria’s other work before we get started!


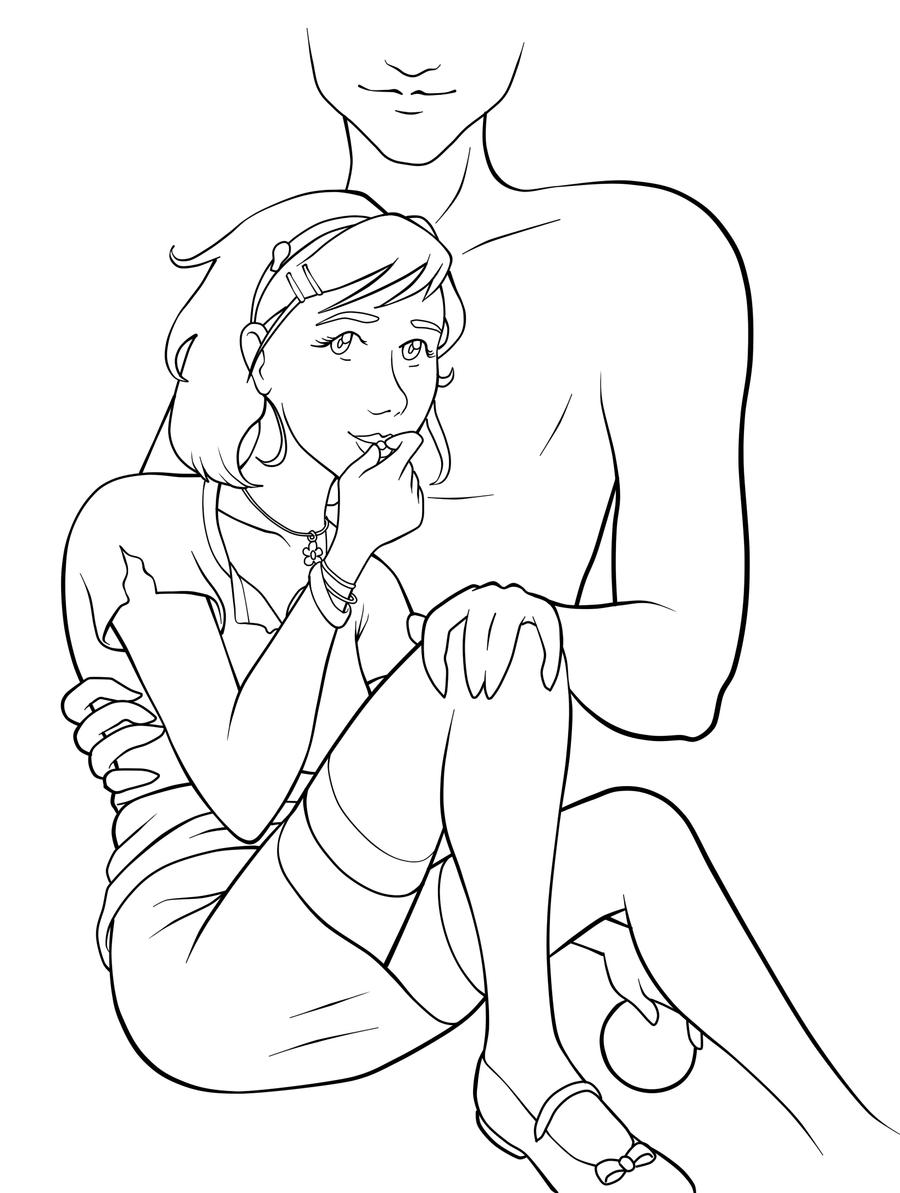
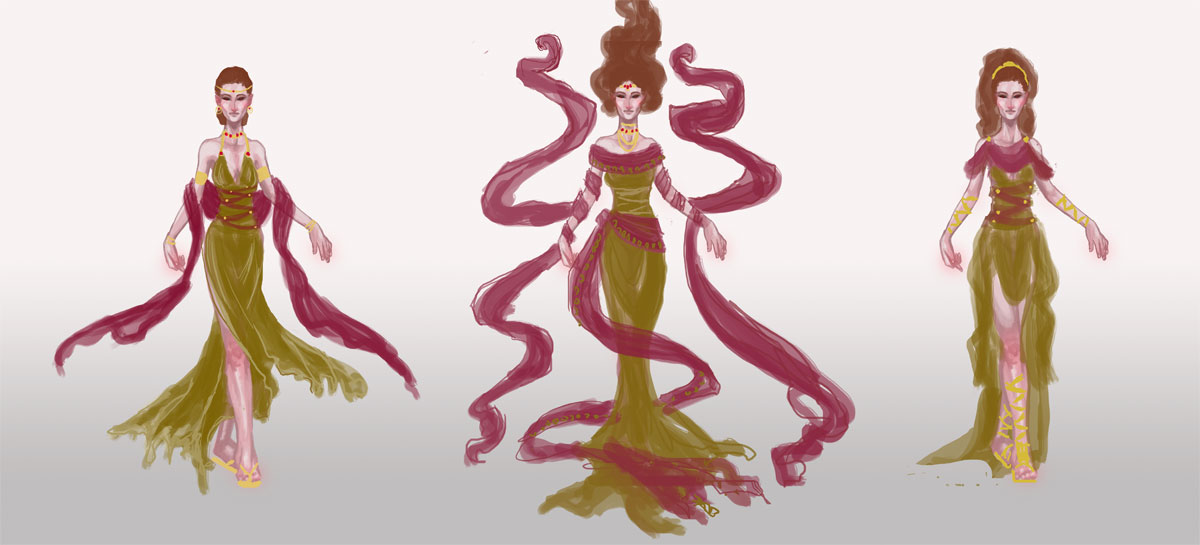
The image up for critique is “Persephone”. Maria’s main concerns were on the use of line width and anatomy, specifically the eyes.
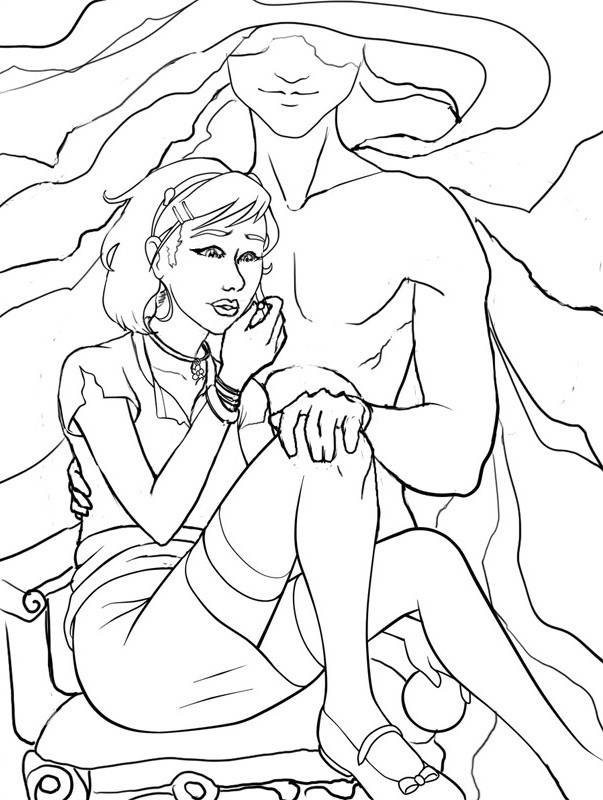
The paintover.

On Line Width

Beautiful!  You’ve never had a problem with creating wonderfully inked pieces, from what I’ve seen of your work.  I think if you want to push the lights and darks in this image that you could add hatching or screentones for shading as well.  Otherwise, cleaner lines like this generally require color to bring a stronger mood and visual impact to a piece.

The Eyes

I think the first thing we look at in this piece would be the eyes. Persephone is glancing right at us and, being the only character with a full face, our attention is brought right to her face. Your description of the piece states the following:
“Even though she’s captured by Hades, she’s discovered she has this sort of power over him–but she’s a little afraid to use it. As she eats the pomegranate seed, her eyes are both hesitant and a little daring. Are you going to stop her? She’s not completely sure she wants you to.”
However, the wide open nature of her eyes actually makes her seem more peppy and upbeat rather than hesitant or daring.  In the paintover, I chose to divert her gaze to the pomegranate seed, which I moved further away from her lips, which suggests she’s thinking of the seed and not interacting with the viewer.  One thing to remember is that even though anime eyes are indeed wide, that doesn’t mean that they can’t be various states of open or closed, which is key in creating convincing expression, even via the abstraction of anime style.  Not rendering the eyelid as you have limits the expressiveness of the eye to looking wide, surprised, or clueless.  In addition, I’d highly recommend doing a few 
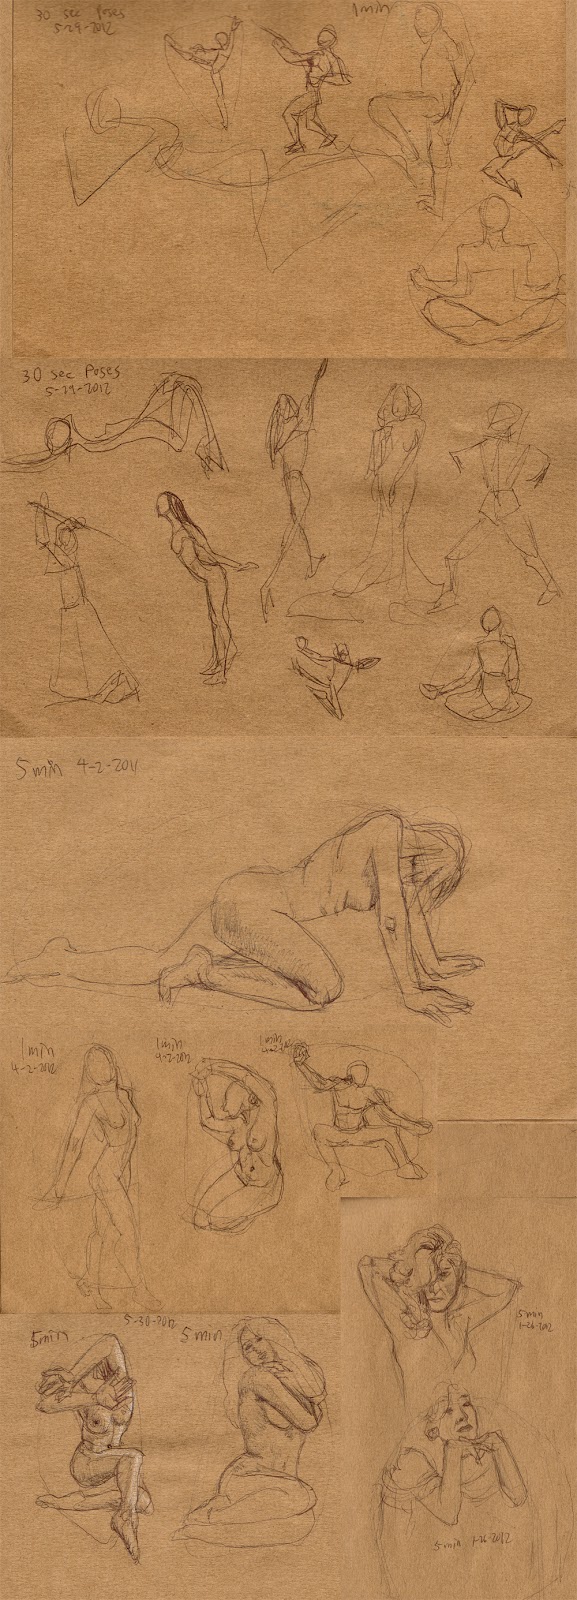
studies of anime expressions to get a deeper understanding of how eyes and expressions are abstracted by manga style.  The ’25 essential expression’ memes are a great way to practice!
Notice how most of these manga style eyes still have eyelids (and if they don’t, the eyelid is generally implied with shading, the eyebrows compensate for the lack of expression by their angularity, or the eyes are simply drawn more slim to imply how open or closed they are):

REFERENCE-Manga eyes by ~Aoi-Ne-Blue

On Other Anatomy 

As for the rest of Persephone’s anatomy, I’ve made slight tweaks here and there. I shrank the head, as it was looking a little too large in proportion to her body.  Unless your style is SD, heads in anime usually aren’t too much larger than your standard realistic proportions, rather that the eyes are generally larger with the mouths being smaller.  I’ve also widened the wrist and slimmed her arms, as they were out of proportion to one another.  I also felt like her larger arms were detracting from her childlike presence.  Finally, I refined the anatomy of Persephone’s shoulder, as the lack of line definition and attention to the protrusion of the shoulder joints made it seem as if she had a hump in her back, due to the fact it reads as one solid muscle.

As for Hades,  he shares a similar problem as far as no definition in the joint of his shoulder and pectoral muscles, which leaves his shoulder feeling like a large solid curve, making it seem odd and disconnected.  I’ve added more definition overall to his stomach and chest and adjusted the perspective on his fingers.  Specifically, I changed the hand holding the small of her back to only show the tips of his fingers, due to the fact Persephone’s torso is showing more of a front view than a side view, meaning we wouldn’t see so much of his fingers wrapped around her because, unless his arms were very long, the points of tension where his hand is holding her would stop as they curl around her side.  Another option is to have his hand wrapped around her shoulder instead, which would be frankly an easier angle to draw and far less awkward, visually.

On Concept

All of these technical details aside, I think you could push this concept even further.  As it stands, I don’t feel like there’s much of a connection between these two, as you have implied on the description of your image (Persephone having a passive power over the infatuated Hades).  Perhaps having her glancing up at his face would help her to appear more hesitant and engage him as a force in this piece?  You could maybe even have his hand (the one grasping her leg) holding up more seeds instead, to imply even more interaction between these two.

I like the fact that you don’t see all of Hades’ face, but for a devious smile.  It gives him the presence of a looming controlling shadow, which suits your description nicely.  In the paintover, I’ve added shadowy swaths radiating from his face to help fill up the space around them and add visual interest and flow to the composition.  I’ve also added a fancy chair for Persephone to be seated on to imply their regal Underworld surroundings.  You could even push that further by having ornate plates of sweets around her that Hades might have been tempting her with.

You’ve got a great start here on a strong character piece!  I hope this critique helps you out and that you’ll be following up later with a finished version I can share with my readers.  Good luck, Maria!

DISCLAIMER: I am no ‘master artist’.  I am always learning, therefore, my word is not the end all, be all.  I encourage you to use this critique to your benefit and come up with your own solutions based on them…or not!

The Artist must serve the image, even if it disobeys the critics. Go forth and CREATE!


Want to send in an image for Critique Corner? 
Read on here to find out how!

Sketch Diary: Persephone Queen of the Underworld

Recent days of self-critique have had me determined to push my fundamental skills even more this year.  To that effect, CGhub’s CharacterForge challenges have proved a really fun and loose way to play around with a predetermined concept for my own whims (while also giving me the incentive of a deadline).  The latest CharacterForge challenge was to design Persephone Queen of the Underworld.

There was just enough physical description given that I had a few concrete elements to work with while the rest was left up to my imagination.  The kidnapping of Persephone and the turning of the seasons has always been a myth near and dear to my heart, so I couldn’t resist trying this out!  It began with thumbnailing to work in the Challenge’s requirement that the image be laid out as a book cover.

Choosing a thumbnail was a tough call for me, as each one of them has something I like!  I love the dangerous gaze of the first image with the focus on character details like jewelry and her outfit.  The 2nd  has a wonderful up and down flow and an air of queenly presence the others don’t.  It boiled down to whether I wanted to go with a Persephone who was still mourning over her confinement to the Underworld or perhaps a Persephone more adjusted to her role as a queen, which, in the end, I felt worked better if she was to be entitled “Queen of the Underworld” in this composition.

I ended up going with thumbnail 4 for it’s compositional flow and the balance of a somber character who still demands some power and presence, as she does with her regal clothing and the ability to nurture a seed of life in the darkest places.  She hasn’t given up hope and obediently awaits the day she will bring Spring back to the world of the living.

I also chose the thumbnail I did because I wanted to push myself away from my usual composition habits, which generally cut the character off at the thighs. I very rarely do full figures so it was time for a change!

The next step was to figure out exactly what I wanted to dress this venerable lady in.  I got the creative juices flowing looking up fashions by Alexander McQueen and a cursory google search of catwalk fashions inspired by Greek mythology, which turned up some interesting stuff!  The 2nd dress in this group really caught my eye with the trailing gauzy fabric.  I knew then I needed LOTS of trailing gauzy fabric for that mystical smokey touch!

Image via Top and Trends Fashion Design.

I already had the basic color scheme and physical features defined by the thumbnails and Challenge description so I decided to use a more fleshed out base rather than a simple nondescript figure (which is commonly referred to as a croquis template, in fashion design terms).

I only had time to do three of these, due to time constraints.  I leaned towards the wrapped bodice style of Greek clothing with sashes and tattered edges to get across the feel of a character who has a sense of decay about her, due to her surroundings, which contrasts with her ability to remain pure and beautiful in the dank Underworld.  Again, something I like about all of them!  Eventually went with the middle because it felt like it had the most presence and flow.  There’s also something intriguing about the first dress, which I may have to revisit later (modern day corporate mogul Persephone, perhaps?).

Then began the fevered late night movie marathon to keep me awake while I worked, since I only had three days to finish!  On my ‘girl goes to underworld’ inspiration playlist:

– Legend – Girl kidnapped by giant lonely red devil for touching a unicorn (another childhood fave).
– Pan’s Labyrinth – Girl has magical adventures while living in an oppressive household. At one point journeys into the underworld realm of the Pale Man (my favorite scene!).
– Labyrinth – Girl ventures into the world of the Labyrinth to save her brother and defeat the Goblin King, who is oddly enamored with her.  Love this movie ever since  I was a kid! It’s Jim Henson at his best.

Five cups of coffee and two Cadbury bars later, we have progress!

Adobe Photoshop CS2, Wacom Cintiq 12WX.

She’s still in need of critique so I can clean her up for my portfolio. Feel free to comment on DeviantART or at WiPNation! I’d value any input on how to make her the best image she can be.
If you’re part of CGhub, go vote for me in the challenge if you like my entry! 
(Voting thread should be up soon.)

Critique Corner – “Tiger” by Kim

For the very first post in my ‘Critique Corner’ column, we have a piece by Kim Ravenfire M.  Have a sampling of Kim’s other work, for starters:


The piece up for critique today is “Tiger”:
Kim’s main concerns with this piece were basic proportions and how to make her images look more realistic in Photoshop.
The paintover:

On Colors and Textures

My first impression was that I was not surprised to hear you have background in drawing more stylized figures, Kim.  This image is very solid with bold coloration and that’s not a bad thing, persay!  Stylization can be good, but when going for a more realistic approach, keep in mind that realism is more about subtlety than showing every detail and shape.  For a furry creature, this tiger has very straight lines defining its edges (the cheeks, back, chin, etc.) and that gives the optical effect of flatness.  The solution  I went for in my paintover was to break up the fur, stripes, and edges with more brush strokes of fur texture.
As for color, realistic style calls for more subtlety in light and variation of cold and warm hues, as well.  I’ve brought a cooler tone of greenish-orange into the orange markings to bring some color variation into his coat, as well as to tie in the green of the background.  If you look closely at your tiger photo references, you’ll see that color variation they have in their coats.  It’s not a pure orange at all, but umbers, oranges, and siennas.
 
Photoshop Tips for Color Variation
A quick trick for adding subtle color variation is to paint the color you want on the highlights on a separate layer above the rest where you want variation (doesn’t matter what kind of Brush), then use the Guassian Blur filter to blur the area completely to your preference. Then, set the layer to Overlay, Lighten, or whichever Blending Mode works best (in this case, I used Screen). That usually creates a nice subtle variation without having to carefully repaint the image!
I also used a Hue/Saturation Adjustment Layer Mask to desaturate the entire piece, then masked off the center of the image so that the orange was still saturated while the rest of the image receded into a less vibrant color.  This way of creating focus by making the most detailed and brightest part of your image the focal point also helps to add realism to pieces, as Photoshop has a habit of making images naturally flat and boldly colored, if we’re not careful.  Don’t know what Adjustment Layers are? Learn them! They are super useful and save lots of time (check this tutorial for more on them).
EDIT: Another tip for color variation (which I forgot to mention during my original posting) is to start by painting on top of a pre-rendered texture.  Doing this allows for the slightest hint of textural and light complexity to shine through into your painting.
On Proportions
Looking at the nitty gritty proportions of our tiger via tiger photos shows that our subject’s nose is perhaps a little too broad, the cheeks too round, and the eyes too far apart.  I highly recommend that you do a few sketches beforehand of your creature from various angles using reference photos taken from various angles so that you can have a clearer understanding of what surfaces are involved in the bone structure. As is, the tiger’s face feels very plate-like in it’s surface shape, as if the nose, eyes, and mandible cheek fluff are all on the same surface area instead of receding into space.
The solution I used was to lessen the roundness of the cheeks while also deepening the shadows of nose.  I squared the jaw off so that it has more of it’s own distinctive shape and also moved the eyes closer together. I cheated and used the Liquify filter to push the areas into shape, but you may need to do some more layering to really make the skeletal structures and shadows convincing.  I also added cosmetic details, such as a bit of texturing and segmenting to the tiger’s nose and the very small shiny lower lip that’s usually visible on most felines.
Overall:
 
Work on breaking up your solid shapes and colors with more texture and color variation, respectively. Pay close attention to what is in focus and what is not in your compositions to bring that convincing depth of field into your work, which will really push the realism!  Finally, check out other wildlife painters.  Even if their work isn’t digital, you can still study how they translate realistic figures into the abstraction of color and how they lay out detail in their compositions.
 
“That Moment” by
Sam Hogg


Extras:
I used this wonderful brush set from Mr–Jack on DeviantART for the paintover. Maybe they’ll prove useful for you for that painterly effect!


DISCLAIMER: I am no ‘master artist’.  I am always learning, therefore, my word is not the end all, be all.  I encourage you to use this critique to your benefit and come up with your own solutions based on them…or not!

The Artist must serve the image, even if it disobeys the critics. Go forth and CREATE!


Want to send in an image for Critique Corner? 
Read on here to find out how!

In Need of Critique?

Well it seems I’m at a sort of impasse with this journal.  Lately, I’ve been returning to the basics to try and work on a few problem areas of my own art, which means working on many life drawing and technique studies.  I don’t really have anything polished enough to share, so sharing of art processes has been less of late, which leaves me with only reviews, analysis, and advice to post here currently.  I’d love to get back to the Games as Art series, but that would mean I’d need to make time to play (or replay) the games I intend to analyze, which will have to go on the backburner till I have more time.  Never fear, for once I have a few more collections of studies, I’ll certainly share them here along with what I’ve been learning!

For now, I’m wondering if any of you might be interested in a critique feature?  Do you have any images you’re working on that have you stumped?  Or are you just looking for feedback to help improve a particular piece?  I’d love to help you get some extra exposure here with my readers in addition to critique, while also helping me to sharpen my visual problem solving skills.  It is my firm belief that to grow as an artist, critique (and self-critique) are some of the most important skills we can develop!  Practicing giving critique would be helping me out as much as it would be helping you out.  I can also put a few of your other finished pieces in the post so it’s a nice little feature of your art, in addition.
Where critique posts are concerned, I would be doing a complete in-depth description and paintover/redline based on what kind of critique you’re looking for in the piece.  I am hoping to do this at least once a month, if not more (should I get enough images to critique).  This is a nice option for those of you who do not feel quite ready for the full portfolio review just yet and would rather concentrate on a single image.  Be warned though. This is for serious critique only. If you have a fragile shell, you may not want to apply as I intend to be very straightforward with constructive criticism.
For a sample of how my critiques usually go, you can peek at my critiques on DeviantART.
TO APPLY:  Send an email to angela (at) angelicshades.com with the subject line “Critique Corner” including the following in your message:

  • Your art in an attachment (or a direct link to the work)
  • A brief description of the kind of critique you’re looking for (focus on anatomy, composition, etc.)  If you’re unsure, you can just say ‘seeking general critique’.

FOLLOW UP: If you’d like me to feature your completed work that was featured previously in Critique Corner, feel free to send me a link to it once it’s done and I’ll feature it in a future Critique Corner post!  It’d be fascinating to see how you implemented the solutions suggested in these posts, or springboarded onwards to your own ideas.
So tell me. What else would my dear readers like to see in this blog?  What are your favorites posts or subjects so far?  I’d love to know so I can keep talking about what you guys want to hear!

Escaping the Void: Loneliness and the Artist

This particular topic has been nagging at me for the longest time.  I’ve talked about Work at Home Blues when I first started the freelancing life.  Now, a few years into this, I’m realizing some important things via introspection and talking to others in the same business.  Prolonged time alone is not conducive to creativity.

For as much as I thought at the beginning ‘hey it would be cool to be left alone to work on all these projects’, that just has simply not been the case.  I’ve had enough time to sit and think about what really drove my creativity when I was younger and that was being in the presence of like-minded people (artists and otherwise) during my college years.  We did plein air painting in class, where we would sit outside and reproduce a drainage ditch in watercolor.  Painting outdoors got us out of the monotonous classroom and forced us to think about the colors of the world and how they related to the colors on our palette.  The art students and crazy anime club people had a lunch table where we’d all gather, chat, and draw en masse every single day.  Talking to other artists got us excited about our ideas, and oh the jokes that pervaded those sacred lunchtime hours!

But college days are done and after those golden years of childhood come to a close, we are left to our own terrible devices.  There is no teacher over our shoulder saying ‘today you will continue to study and improve your work!’.  There’s no one to drag you outside and make you observe your own world and how it can improve your art.  It’s so tempting to stay inside and avoid going out because you’re going to ‘get more work done’ or ‘gas costs money’.  I find myself making those excuses on a daily basis and it’s led to a lack of motivation and inspiration more than once.

I feel the most inspired when I have experiences in my life driving me onward. This could be as basic as going to the park or Callaway Gardens to marvel at the simple beauty of nature (♥ the Butterfly House).  Or it can be as complicated as animators taking a trip to the Great Wall of China to make sure their project has the authentic feel of ancient Asia in their work (a la the creators of Avatar: The Last Airbender, whose concept art book I’ve been reading lately).  Creativity evolves from energy, experience, and making the unseen connections.

So how do we combat loneliness?  Get our hermit butts out of the house!  Go to sketch meets. Don’t have one in town?  Start one!  Facebook and Meetup are great tools for that.  If you’re low on funds, try your local park where it’s generally free to go look at some ducks.  There’s also the library where you can read books for free and study quietly (surprising how often we forget libraries exist!).  Join your local art society, which serves the purpose of getting your pale self out of the house and networking with a more knowledgeable crowd (this can also lead to marketing opportunities, too!).

On the note of joining art societies, I have had my own strategies of avoidance, like thinking that nobody will like me because I’m very much in the fantasy arena while most societies around here specialize in fine art landscapes and folk art.  I feel like I won’t fit in, but in my experience so far, people are there because they simply love creating art!  You are there to share the love.  Most societies will just be happy to have new members to carry on their legacy, as well.

Monotony is a killer of the human spirit. Don’t let yourself fall into the trap! Remember that solitary confinement is considered a form of punishment for a reason.

(Know of any places artists can find local meetups and sketch jams? Share in comments!  I’d love to know if there are any in the Newnan, Fayetteville, and Peachtree City, GA area, myself!)