Category: displaying art

Con Report: Dragon*Con 2012

Sporting a leather Magpie feather
made by the multi-talented
Brenda Lyons!

My brain has finally returned from Dragon*Con 2012 (some days after it officially ended, I might add)! It was a haze of cool costumes, reunions, and meetings, as it usually is.  This is going to be a LONG entry, so grab a cup of tea and get comfy!

The Con

This year was an odd duck for me. I spent most of my time selling at my table in the art show, running to panels in the art track, and riding on the train since we commuted in. I didn’t get a chance to see many costumes or really leave the Hyatt.

I did, however, brave all three dealer’s rooms to hunt down amazing artists Michael C. Hayes, Stephanie Pui-Mun Law, and Echo Chernik to buy their books, which I had been looking forward to doing for a long while! There’s no better feeling than to shake an artist’s hand and show them you support their work by buying a book directly from them at a show. This probably worked against me as I suspect I spent all my profits doing just that!

I also met several cool folks I have known online for ages, but had never met in person. So many folks came by to say hello and show their support!  It really made me feel special this year and I have no words to express how this warms my heart. Thanks, you guys!

The Selling Experience

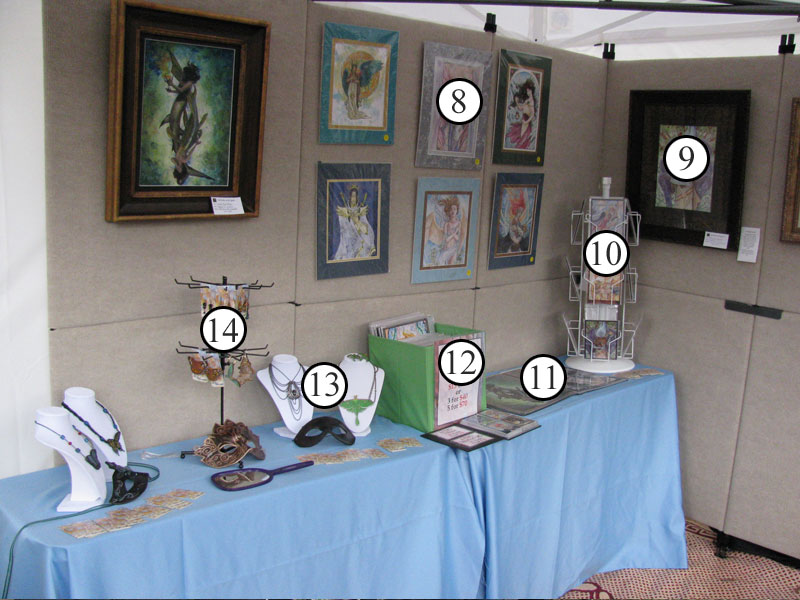
As always, the Dragon*Con art show is a well oiled machine!  Set up and break down went smoothly, despite the fact I had three times the stuff I usually do this year.  I sold decently at the art show and hit my selling goal to break even, plus a few hundred.  My best selling work at the show was The Lotus Dancer, which I sold out of at my table, while none of my masks sold from the 3D table, which I’ll probably be dropping next year.  People seem to buy more masks right off the gallery bay, so I suspect that’s where I’ll be putting my masks from now on.

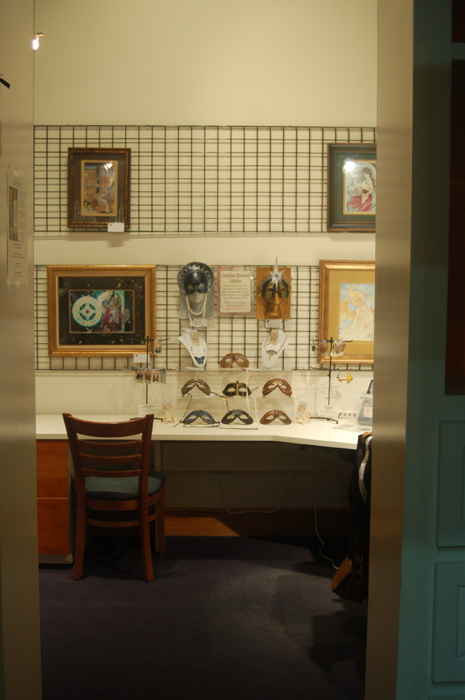
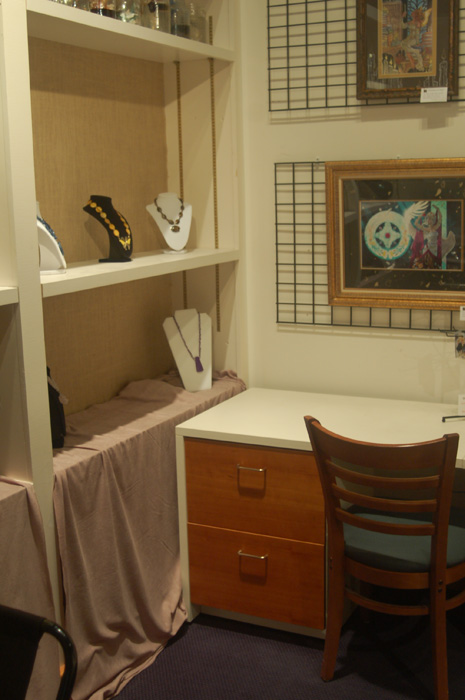
What I  Learned About My Display

For the first two days, I had nothing but older watercolor work of mine up on the panels arranged in very symmetrical grid patterns.  I have Death the Kid level obsession with symmetry, which works against me sometimes when I put up art for display!  My boyfriend tried an experiment of arranging a whole new selection of my digital works in asymmetrically balanced patterns and we noticed this seemed to grab the attention of con-goers far more. Lesson learned. Gotta dump my old work, get larger pieces for max eye-catching capability, AND stop being so symmetrical!

Other Stuff I Learned About Displaying Art

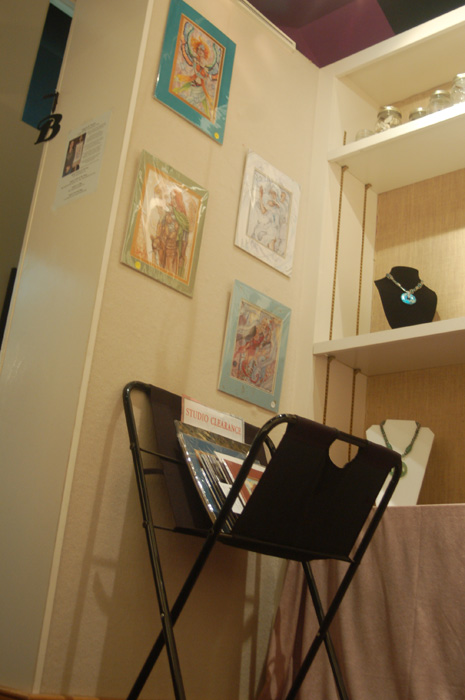
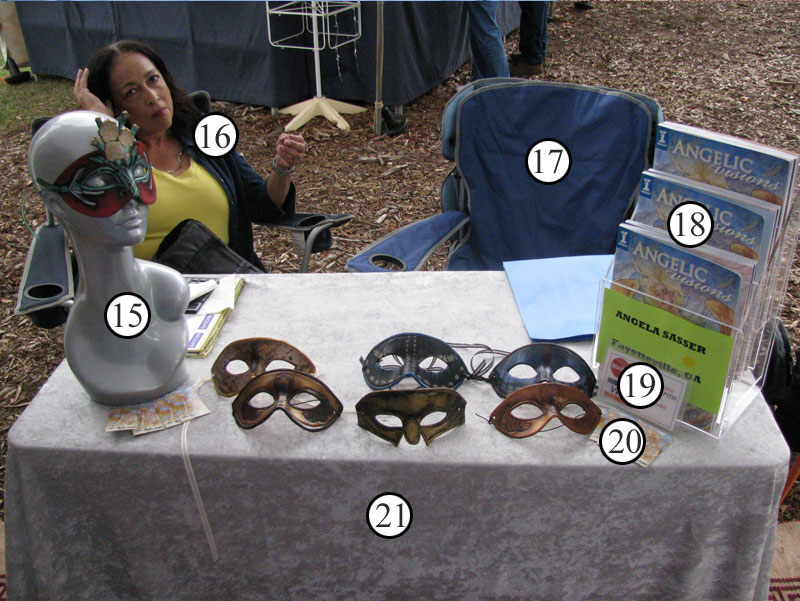
  • Tiered wire magazine racks make for great mask displays!
  • Instead of stretching canvases on stretcher bars, I want to try affixing them to masonite and covering them with gel medium. Annie Stegg used this to beautiful effect!  Her prints had the texture of her original paintings after applying the gel medium.
  • Offer more sketches and/or sketchbooks.  A lot of artists have been doing this and it seems like a smart way to get a little added income from your sketches!  Instead of rotting in my art pads, I could sell my doodles in bins or baskets.  Got to break my sketch hoarding habit!
  • Start ordering things wholesale. A couple of the other artists looked at me like I was crazy when I told them I hand cut all of my mats myself.  It’s time consuming and I can save a lot of time finding places that sell mats, backing, and bags all in one place for cheap at a bulk rate. (Anyone know any suppliers? I have been looking into Matdesigners.com)
  • Mitch Foust had an amazing looking display that folded up into little collapsible panels AND included its own lighting setup!  It also costs far less than my Propanels and seems to take up much less space.  It’s called The Original SMART Exhibit and it is lovely and professional looking!  It may not work well for my outdoor shows, but it’s a good choice for the inside ones.

My First Portfolio Review

This year was the first year I worked up the courage to ask other pro artists to review my art at length.  I talked to both Justin Gerard and Dan Dos Santos, two illustrators from Muddy Colors with amazing work who gave me some stellar advice at my review and during their painting demos, which I will paraphrase here:

  • Use more reference. They knew instantly where I had fudged anatomy and it really brought down the overall believability and quality of my work where I didn’t use it.
  • Relates to the last one. Do more preliminary studies and thumbnails. Both Justin and Dan did an alarming amount of planning until the next step in their production was merely  to copy the preliminary to their final format. My planning phase has always been short and rushed and that needs to change.  They did whatever they had to, from taking model shoots, to photomanipping in whatever props and faces they needed in the prelim phase.
  • NO PHOTOMERGED TREES! *hangs head in shame*
  • Cut out ALL of the old mediocre work from my portfolio. Out of 20 pieces, only 5 were really viable to show to an art director.  This means I better get cracking on new work!  If I’m not producing at last one polished piece a month, I am not being serious about my career nor will I get the amount of high quality images I need in my portfolio in a decent amount of time.
I’ve already emailed the both of them with my sincerest thanks!  I suspect the advice they gave me is really going to change my career in the best of ways, plus they are just two wonderfully nice fellows!  Don’t be afraid to chat them up if you see them at a con.

Photo and Video Stream

I only took a couple of photos this year while I was hurrying through the Marriott to the dealer’s room, but you can see them here.  I also gave a panel on leather mask-making, which you can watch the video walkthrough here.

Here’s a preview of two really awesome cosplayers who had built their costumes around my Red Dragon and Seraphim leather masks. You look stunning, ladies!

The Red Dragon and Seraphim masquers. More of my masquers
can be seen at Angela’s Masquers.

What’s Next?

I have been debating back and forth if I will even attend Dragon*Con next year.  My budget is very limited and while I always have a blast at this con, I really want to try attending other conventions geared for artists, such as Illuxcon or Spectrum Fantastic Live Art, where art is the focus and I can make more career contacts.  If I can do them all, I will, but it’s time to venture outside of my comfort zone, meaning that Dragon*Con will be prioritized beneath these others.

But this also means I have a whole new journey ahead of me to produce new, improved work so that I’m not just showing the same old tired pieces to people.  I also need more subject matter relevant to the gaming industries in my portfolio, if I am to seriously pursue the kinds of jobs I want there.  This probably means less floofy angels and more Elves, which I can’t argue with!  I have an action plan for doing this, but I’ll save that for next journal entry!

Thanks for joining me for my Dragon*Con wrap up. See you all next year, maybe?  If not, remember me when you see cosplayers in leather masks and/or wings. Take a photo for me!

My Studio Photo Tour

Last post I mentioned the fact that I was able to fanagle a studio spot in a small gallery in town where my mother and I are sharing a little work space (about 10’x10′ all in all).  At $200 a month ($100 a piece), it’s a pretty sweet deal!  I’ve spent all of this past week prepping it for display and the ensuing flood of art junk that will finally make it habitable for an artist.

Without further ado, I present to you a photo tour!

Oh what’s that nook shining in the dark?
Come closer, my pretties!  The shinies await!
Still filling out the walls. A banner will probably go there in the top-middle.
To the left, we have my mom’s corner of the gallery where she makes shinies for
the magpies in all of us! She has an Etsy shop called Lee’s Curio if you want to see more.

Inside of the door. An artistic shot of the print rack.

These look familiar to anybody? They were the ‘bottled dream’ jars from
my senior show at West Georgia! So far, I’ve gotten more questions
about what the jars mean than the artwork, itself.
Curiosity is funny that way.

Close up of my leather crafts! I have them stacked on top of clear
collectible cases that were meant to hold dolls that I found on clearance.
They’re perfect for stacking for translucent tiered displays.

A close up of the print bins. Got the 3 bins on the left from Walmart in
the plastic bin aisle.  They’re sold as ‘shoe bins’.
The card bins on the right were from Michaels.  Clearance specials FTW!
To the right we have my little work space. That glowing immaculate spot on the counter is
where I’ll soon be painting! I expect that counter won’t be so clean in the near future. You can tell
I’ve barely had a chance to work in here because it’s so clean and bare of art supplies.

The pictures on the wall are temporary placeholders till I can get some works in progress going.
Check out how awesome the print of Persephone came out!
Kudos to Photos2canvas2u for their awesome canvas print rates!

That’s all for now!  Expect a video tour in the near future as well.
I suspect I’ll have a follow-up photo tour once the studio has been nice and dirtied up with work!
I can’t wait to get started. Bua ha ha!  What is your studio like? Feel free to share in comments!

Anatomy of an Art Fair Display Part 2

(Continuing Anatomy of an Art Fair Display Part 1, which featured the main items involved in an art display setup. Now for a closer look into the nooks and crannies of the display!)


9. Curtain Hooks – I used curtain hooks to support my framed pieces. Be sure to get the ones with the super sharp ends! I was not happy to find the first batch of hooks I bought were the blunted kind, which equaled much cursing and trying to stab a carpet with a blunt object and failing. ($2 a pack at Lowe’s)

 
10. Rotating Counter Rack – Great for the display of small prints or greeting cards and you can put a little sign on top. This particular rack has been with me for years now and has survived! ($35 at Displays2go)
 
11. Portfolios – I used an Itoya portfolio to display my large prints.  For the art cards, a simple trading card album worked well! ($5 – $11 at Hobby Lobby)
 

12. Print Bin – Actually a collapsible file box. Bottom comes out and it folds down, making it much easier to transport than my solid heavy print bin.  I’m thinking of replacing this with a much more rustic looking woven rectangular basket from Lowe’s (which is advertised as ‘closet storage baskets’). ($10 at Walmart)

 
13. Necklace Forms – I prefer the white ones as they show lint and dust less and my jewelry stands out against them. ($12 at Joanns, Hobby Lobby, and Michaels.)
 
14. 3 Tier Rotating Rack – These racks come with three levels of hooks which are great to display small items like bookmarks, keychains, earrings, and bracelets.  You can adjust the level of the tiers or remove them completely.  ($26 at Store Fixtures, USA)


15. Mannequin Head – This head came with pierced ears, making it great for displaying jewelry in addition to masks!  ($26 at Store Fixtures, USA).
 
16. Minion (aka. Mom) – Art fairs are sooo much easier if you can trick someone into working for you in exchange for food!  That way you can actually use the bathroom without having to burden your neighbors with watching your stuff while you run as fast as you can across the street to the poddy and back.  Minions also make load in and load out 200 x easier. (Priceless! I love my mum.)
 
17. Director’s Chairs – My family was already using these to stake out sporting events. They fold up for easy transport and are much more comfy than plain folding chairs.  The drink holder is handy as well if you don’t want to put your cup on uneven ground or on your table with your art. I think we got these chairs at Sam’s Club, but I am unsure.
 
18. 3 Tiered Plastic Magazine Rack – Great for books, prints, and anything roughly 8.5×11 in. shaped! ($30 from displays2go.com)
 

19. Visa/Mastercard Sign – A simple plastic sign used to notify customers that I take credit and debit cards. I printed it off on cardstock and slipped it into the stand. You’d be amazed at how comforted people are to know that you can accept plastic money! Many people don’t carry cash anymore, either because they prefer not to or because they’re trying to limit their budget. Accepting cards is a good way to be that evil influence prompting people towards impulse purchases. That sounds bad, but hey, it’s true! ($5 at Walmart or Staples)

 
20. Business Cards – Always ALWAYS have plenty of these on hand for customers (or for trading with your neighbors!) Networking is one of the biggest assets of actually venturing outside of your art cave and attending events!  I usually buy mine in 1k bulk packs from Vistaprint when they have special offers. They usually toss in a free pen or ink pad too, just watch that you don’t click to confirm any subscriptions during their lengthy checkout!  I hear redtagprintsale.com has some nice prices on biz cards, but haven’t tried them yet. (Roughly 10 cents per foil stamped card at Vistaprint.com)
 

21. Crushed Velvet Table  Cloth – This piece of material has been with me from the very beginning! It’s actually just an oversized piece of crushed velvet I got at the store when it went on sale. I’ve used it as a backdrop when photographing crafts, as a backdrop for hung pieces, and also as a way to cover up my table when I leave and don’t want people to be tempted by what’s left underneath. (Approx. $3 a yard on sale at Joanns Fabrics)

And that’s all for now!  I’m curious to see how my display will evolve over the next few events.
I’ll be sure to let everyone know once it has leveled up!

Back to Part 1

Anatomy of an Art Fair Display Part 1

So now for something completely different!  With the art fair season nearing and so many folks expressing their thanks for the usefulness of the Evolution of an Artist Alley Table posts, I thought it high time to post my art fair diagrams!

Mind, that this display is my very first setup and will probably change down the road as I learn, improve, and add things. Let this journal act as a record of where I began and hopefully as a tool for others looking into selling at fairs!

You might recognize some of these items and descriptions from the Artist Alley diagrams because I totally believe in re-using things where possible.

My first fair on Fayetteville’s courthouse square!

1. EZ Up Tent – This tent is a great first tent for those who don’t want to spend the $1k that most of the Craft Huts cost!  It can be set up by one person, is white (as per most art fair requirements), and fairly easy to transport in its included roller bag.  Here is a video on how to set it up with one person (because I didn’t find the included instructions very helpful).  Be warned, however, as this tent is light and is known for blowing away and wreaking havoc!  I snagged some velcro weight bags which you can fill with sand or gravel and that strap to the poles so people won’t trip over them. ($200 at Sam’s Club)

2. Retractable Vertical Banner – A pricey item, to be sure, but the fact I don’t have to carry around a big pvc pipe set nor have it taking up space in my car makes this item well worth it! This vinyl banner pulls out from and retracts back into a spring loaded base that is about as big as a tabletop easel and very lightweight. I’ve lashed it to the tent pole using velcro straps so it wouldn’t blow away. Mine was printed by my brother’s sign shop. ($300 at Graphic Signs Atlanta for stand with metal base. $100 for cheaper version at Staples)

 
3. Propanels – After much debate over whether to get carpet panels, roll up mesh panels (which are about half the price), or to jerry-rig my own from something, I decided to go all-out with Propanels. Mesh panels, while collapsible and therefore more transportable, were still about $1k after all was said and done.  I also can’t use mesh panels without the support of the tent’s rafters, whereas Propanels can stand on their own, making them useful for any cons or shows I do without a tent. The ‘knock down’ variety of panels pictured here can be split in half and transported far more easily than the full panels, even if I’m still having trouble fitting them in my teeny hatchback. ($2k from Propanels.com for the Booth A setup with Knock Down Panels plus required hardware. I owe my family favors for the rest of my life for this one. Ouch.)
 
4. Tables with Table Cloths – The two small display tables on the left of the picture are actually tail gating tables bought from Big Lots for cheap which fold up and have an easy carrying handle. They were super light, however, so I had to weight them down with objects on top. The table cloths were just scrap bits of material thrown on last minute, I admit. The larger table on the right is a white plastic table bought from Sam’s Club that folds up and can also be carried. It is a bit heavier than the tail gate tables and doesn’t really need to be weighted down. ($20 – $30 at Big Lots and Sam’s Club.)
 
5. Easel with Signage – The stand up easel was purchased at Joanns Fabrics and is just a simple cheap wooden one without any bells and whistles. The sign was printed on foam core by my publisher and was eventually replaced in this setup with a piece of framed art instead. I’m fairly sure you can get foam core signs like this at Kinkos or other printing places. ($10 at Joann’s Fabrics)
 
6. Folding Canvas Print Bin – This is the medium sized print bin available from Dickblick.  Prints ranging from 11×14 in. to 18×24 in. look best in it.  I noticed most people would stop and flip through it rather than venture into the tent. Note to self – MOAR flip through bins for people! Folks looove to browse through them for some reason. Folds up for easy transport. ($25 at Dickblick.com)


Stuff I forgot to include –  The Carpet – I like the idea of a carpet in a tent. It feels so much more cozy, as if you’re walking into a little shop!  It also made the ground a little more even for customers to walk on.  We also used it to lay items on while we were setting up so they wouldn’t get muddy.  My family picked this up in a flea market in Saudi Arabia years ago so I have no idea how much it costs.
 

This entry is going a bit long, so I’ll be breaking up this grand monologue on art fair display into parts.

Stay tuned for a closer look at the particular display items nestled within the tent next time!
 

Evolution of an Artist Alley Table II

Back in September of 2009, I posted a list of what goes into my display in an artist alley.  Now two years later and a few events wiser, my display has evolved!

Show them what they’ve won, Vanna!
 
Anatomy of an Artist Alley Table – Part 2
  1. Retractable Vertical Banner – $300 – A pricey item, to be sure, but the fact I don’t have to carry around a big pvc pipe set nor have it taking up space in my car makes this item well worth it! This vinyl banner pulls out from and retracts back into a spring loaded base that is about as big as a tabletop easel and very lightweight. Adds to my vertical appeal and allows people to notice me over the heads of the crowd. Mine was printed by Graphic Signs Atlanta.EDIT: I’m told Staples offers a cheaper $100 collapsible stand now too!
  2. Standing Easel – $13 – These simple wooden easels are great for propping large prints for that eye-catching vertical appeal!  I’ve been using these to prop the blow up of my book cover at book signings as well.  When I’m not promoting the book, this cover image will be replaced by a piece of art instead. Bought at Joanns Fabrics and Crafts.
  3. Gridwall Cubes – $30 –  Also called wire cube storage. These have been with me since the beginning! I use them to clip prints, mousepads, and prints to, though I’m looking for an alternative display method for the masks currently. The wire distracts from their detail so I’m either going to cover them with fabric or buy some gridwall hook attachments that project from the wall so the masks can be placed on them some distance from the grid instead. Found mine at Target.
  4. Mannequin Head – $40 – Affectionately named Shay, she helps bring more visibility to my masks and other artisan crafted items! Her ears are pierced so I can add earrings as well as display a necklace and a mask all on the same head.  Found her at Store Fixtures, USA.
  5. Visa/Mastercard Sign – $5? – A simple plastic sign used to notify customers that I take credit and debit cards. I printed it off on cardstock and slipped it into the stand.  You’d be amazed at how comforted people are to know that you can accept plastic money!  Many people don’t carry cash anymore, either because they prefer not to or because they’re trying to limit their budget. Accepting cards is a good way to be that evil influence prompting people towards impulse purchases. That sounds bad, but hey, it’s true!  Can’t recall where I got this sign and how much it was, but it couldn’t have been more than $5 and probably came from Walmart or Staples.
  6. Basic Tabletop Easels – $5? – You can probably find these even cheaper if you buy plastic instead of metal.  In my case, I was actually using a small metal easel used for displaying antique dinner plates.  Great for propping up items like prints and books again for that vertical eye-catching appeal!  It’s harder for people to notice your work if it’s all lying flat on the table, especially where there are big crowds.  Can’t recall where we got these at, but probably Staples or Walmart.

  7. Horizontal Vinyl Banner – Price varies per footage – Another item that’s been with me from the beginning. Even though I have the nice vertical signs, I still like to hang this out in front so the front of my table doesn’t look too boring.  It was a little too big to hang behind me anyways and was rather overpowering my display! It looks much better hanging out in front. Printed at Graphic Signs Atlanta.
  8. Itoya 11×14 Display Portfolio – $11 – I had a small 5×7 portfolio on the table for the campsite to show off my work and to make room for more items, but people kept passing it by!  Eventually opted for this imposing portfolio which prompted more people to stop and flip through.  I also had a sign up sheet and business cards tucked into the plastic pocket at the front so people could leave with ways to be reminded of my existence.
  9. Trading Card Album – $5? – This small album housed ACEO and ATC organized into open edition, original, and limited edition settings. They represent my affordable offerings for the casual buyers who may not want to invest in large items, but don’t mind dropping a few bucks on cute collectible cards.  Bought from Michaels.
  10. Print Bin – $10 – Actually a collapsible file box. Bottom comes out and it folds down, making it much easier to transport than my solid heavy print bin, which now serves as a permanent inventory housing item here at home.  Found at Walmart.
  11. Greeting Card Rotating Countertop Rack – $35 – Another item I’ve had from the beginning! It is sometimes replaced by a standalone rack that sits in front of my table, but I can’t use that one on a regular basis because some shows are picky about you having items in front of your table that folks might trip on.  Little children also like to spin it until it falls on their heads!  This smaller rack houses my 5×7 and matted 4×6 prints.  Purchased from Displays2go.
  12. Binder Clips (40 pk) – $5 – Oh the many uses of binder clips!  I used them to clip the prints to the grid, to hold my banner to the table, and for fiddling with when I’m bored. They make nice talking finger puppets!  I prefer the gold variety as it looks a bit more decorative than the silver. Found at Staples.
  13. Crushed Velvet Table Cloth – $8 a yard – A mysterious number 13 I forgot to number in my photo! This silver cloth serves a multitude of purposes. First, it covers up the hideously distracting plain tabletops, is large enough to cover the entire display when you have to leave (if you have two on hand), and can also serve as backdrops for photographing products!  Velvet is great, as I’ve mentioned in previous photography tutorials.
Alternate Displays
 
While the aforementioned display works well for events where I’m mostly selling art, some events require a different setup to accommodate my more crafty items!
 
Flashback to Faerie Escape Atlanta, 2010!
The only thing that’s different here is the inclusion of a metal jewelry tree and velvet necklace, which helped bring a level of professionalism to my items that laying them flat on the table didn’t.
 
Metal Jewelry Tree – $20? – Mine was a Christmas present from the family so I have no clue where they bought it! I’ve seen some creative takes on the jewelry tree where people have taken branches from a real tree, cleaned them up, and shaped them to suit their needs. Then jewelry is hung off them with little leaf-shaped tags for an organic theme.
 
Velvet Necklace Forms – $2 – These velvet covered neck forms really make for a stylish addition to any craft table.  I bought mine at Joanns, but have found bigger ones for longer necklaces at Dawson Jones for $12.
 
That’s it for now! I’m currently transitioning my display to fit an art fair booth setup, so expect posts on this topic sometime in the future!

The Evolution of an Artist’s Alley Table

(My display has since leveled up! See the new display.)


After the last couple of conventions, it seems my artist’s alley table is growing and evolving into something grand! I am always seeking ways to improve and welcome any suggestions you might have.

It started out at an Anime Weekend Atlanta of years ago where I just tossed unmatted and unbagged prints on the table and sold them for $5-$10 with a banner hung out front. Then we had the Dragon Con display this year with an elevated banner and slightly more offerings of necklaces and matted prints.

Now, we have the Anime Weekend Atlanta display where we pulled out a few more stops to make our display the best it could be. Here’s a run-down of what we did.

The Elements of an Artist’s Alley Table

1. One Sleep Deprived Artist – Complete with circles under the eyes and friendly smile. Customers like to see the artist at the table so they can talk to you personally and maybe watch you while you’re working on a project. People like to be close to that creative flow and are generally curious about ‘the life’. ($100,000,000 or 100 steak dinners)

2. Professionaly Printed Vinyl Banner – Printed at my local sign shop by my wonderful brother over at Graphic Signs Atlanta. I chose vinyl because it can take abuse and weather the elements. It’s guaranteed to last longer than a paper sign. (FREE, generally $6 per square foot)

3. Backdrop Display – This is actually a piece of photography equipment called a backdrop kit. The poles break down and it comes with a handy carrying case to store it all in. It is relatively lightweight. I generally use this set for my stock photography needs. Bought from eBay. ($85)

4. Jewelry Stand – My dad made this wood stand ages ago and I stole it from my parents’ bedroom. I always wanted to order a 14k gold necklace to keep inside it but never could get the money together. You can buy cute tree style stands from eBay for pretty low prices. Having a stand for necklaces helps draw in the crowd with more visibility for your shinies. (FREE, generally $25 for a nice one, less for a wire one)

5. Small Prints – I like to have these out for folks who don’t have a large budget for buying the larger pieces. At only $5 a pop, they’re a colorful way to help fill up empty space on the table and provide a low end price option.

6. 3 Tiered Magazine Display – Purchased from displays2go.com. Instead of magazines, I put in matted prints. People enjoyed rifling through it, but I want to invest in one with deeper compartments with more room for people to flip through. ($30)

7. Greeting Card Rotating Rack – Purchased from displays2go.com. I used this to display matted 4×6 prints and unmatted 5x7s which fit snuggly in the slots. It’s amazing how a rack like this can give your work a more professional feel. This is pretty lightweight for transport, if a bit bulky. ($35)

8. Canvas Bin – Purchased at Big Lots. I used this to display more large prints to rifle through for those who wanted something a little more beefy than the 5×7’s. ($15)

9. Cube Grid Walls – Another item that was donated to me. These grid walls were a lifesaver for making my display project upwards more. They stack easily when broken down and give you plenty of space to play with as far as hanging art. I had only 6 cubes, but imagine what you could do with more! (FREE, generally $16 for 6 cube set)

What am I missing?

Display Portfolio – I didn’t have it out in this photo, but I had a portfolio of my best work laying out on the table housed in an Itoya notebook with a custom printed spine. ($8)

All in All…
I feel the weakness of this display setup is that it is slightly bulky, but the ability to project upwards I feel is a necessary one for my tastes. I’ve also been told carrying primarily more expensive items forces people to buy those instead and that a lighter setup is easier to do. My experiences have shown this does not work for my particular set of items and audience, though this lighter setup with more expensive items may work at conventions where customers are more willing to pay for top dollar items. At smaller cons, customers seem to like an option for smaller budgets.

The next big step in my display campaign is to figure out what I need for a large 10 x 10 foot space, the standard floor plot for art fair space. I sense canvas panels, tents, and god knows what else in my future!

Questions? Comments? Suggestions? Feel free to drop ’em here!